To set up your E-mail Account in iPhone
You can use your Apple iPhone to receive and send email. For this purpose, you need to set up the mailbox in your smartphone. The iOS device has a native mail app and it supports all popular email accounts. The app not only allows you to send and receive emails but also has other features. These include the creation of folders and filtering options for Spam or advertising.
Add a new e-mail account
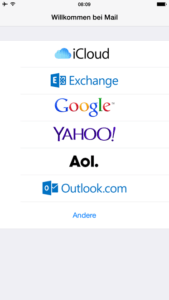
Switch to the home screen of your iPhone and click the settings icon. Scroll down with your finger and open the menu item "Mail, Contacts, Calendar". Select "Add account" in the upper area. To use an existing account in iCloud, Google or Outlook, click the appropriate icon. If you want to add a new email account, click on "Other".
In the next screen please select the menu item "Add mail account". Fill out the form completely. Fill in your name, your e-mail address, your current password and optionally a description for your e-mail account. A description is especially useful if you use multiple email accounts with your iPhone. You have created or changed your email address and password yourself. Once you have filled in all fields, click on "Next".
Enter server data for incoming and outgoing e-mails
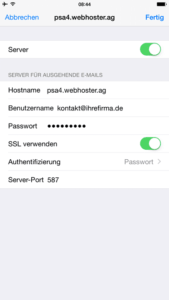
Now you need to enter the server data from your email account. In detail, you need the host name, a username and a password for the iPhone setup. All necessary information can be found in your access data. You have already received these from us. In the field "Hostname" enter the web address of the server. In the "Username" field, simply enter your email address. This is the same combination of username and password that you use to log into your e-mail account on the Internet. Please enter all Data also in the field "Server for outgoing mails" below. Then click on "Advanced".
SSL encryption must be enabled
In the advanced settings you should check again for security reasons whether you have activated SSL encryption for your incoming mail server (IMAP). Your iPhone can only retrieve email from your account if encryption is enabled. With a single touch you can activate SSL encryption. The next step is to make sure that your outgoing mail server also has encryption enabled. Select "Authentication" as the method "Password" in the field below. To send your e-mails, use port 587.
Finally, check all entries and settings again. If everything is entered correctly, select "Done" in the top right-hand corner. You have successfully completed the setup of your email account on the iPhone.
Customize the mailbox to your personal needs
After setting up your email account, you can go back to your Home screen. There you can select the Apple mail app. It's best to test it first and send an email to a friend or acquaintance. They should then reply to you directly. This way you can make sure that your email account works with your iPhone without any problems.
All important standard folders, such as Inbox, Drafts and Sent, are already available in the mail app. Click on "edit" in the top right corner, then you can create additional folders. Different locations keep your mailbox clearly arranged.
Send and receive email from your iPhone
If you would like to compose a new e-mail with your iPhone, click on the blue icon in the lower right corner. Similar to your computer, you can enter one or more recipients and a subject. You can also send attachments in the form of pictures and videos directly by e-mail. If someone sends you an e-mail, it will automatically end up in your inbox. You can then distribute the received e-mails individually in suitable folders. Your Apple iPhone receives new email whenever it's connected to the Internet. The Mail app doesn't have to be open all the time for this purpose. When you receive a new e-mail, you will be notified visually and acoustically. A red number will appear on your Home screen for the Mail app.


